Thursday, June 21, 2012

Studio J Layout #5

Last, but not least, is the 5th  Studio J layout homework assignment.  I actually got to do one that wasn't girlie.  I am not used to doing non-girl themed layouts, so when I saw their guy themed layout I decided to go with what they had.  Well, of course I changed some things, because I can't help myself, but for the most part I followed instructions. 

My guy is very supportive of my scrap habit, so it's only fair that he have at least one layout out of the five.   Now, whether he likes the idea of being the star of this post or not, I haven't a clue.  As long as we don't tell him he will never know ;) That's what he gets for not reading my blog :P lol. 

This assignment was;

Kit:  Victory 
Pattern:  Harmony
Technique:
  • Making pleated ribbon out of ribbon tabs
  • Rotating a page
  • Cropping My Stickease Images
  • Camouflaging with a text box
  • Changing the color intensity of a B&T design
This paper pack is out of our current idea book.  It's great for guys, military themed pages, and dads.  The pleated ribbon on the page was made out of individual ribbons from the embellishment tab.  It was super simple once you got the hang of lining it up.  There is a trick to it.  Once you get it you're good to go.  The title was made by  layering  My Stickease and journaling boxes with a few brads thrown in there.  Not a very difficult page and I liked the outcome. 

That is the conclusion of my homework and with only a few weeks to go until convention.  I can't wait to get back and show off all the new goodies that will be coming with the fall idea book. 

Thanks for stopping by.  Happy Scrapping!


Wednesday, June 20, 2012

Studio J Layout #4

Almost done with my Studio J layout posts.  This is the fourth of five layouts I was doing for my convention homework.  This one I did exactly like they did.  I made the ribbon out of a forward slashes (which I must say is a lot of trouble, but does look really neat).  I chose the colors they chose.  I did everything just as they did. My pictures were even similar.  I worked on it for quite a while, then I changed my mind completely..lol.   I actually made two seperate layouts with the same pictures, some of the same techniques, but totally different paper kits.  I wish I could show you both and see which you liked better.  But, I had to delete one to make my order.  Otherwise, I would have had 2 layouts with the same exact pictures.  All in all, I think I will be more pleased with the one I chose.  I am the one who will be looking at it for years to come anyway.   Here it is:


The assignment was as follows:

Kit:  Magic Moments
Pattern:  Powerful Trio
Techniques: 
  • Using a My Stickease image to make a border
  • Creating a layered ribbon bow
  • Creating striped ribbon using a text box
Well, I did the first one.  I did the last two on the layout I deleted.  This paper pack was just more fun to me.  This kit is Splash Zone and the pattern is Powerful Trio.  I did use a My Stickease image to create the borders under the title and journaling. And that's about it.  Although this kit also had tags in the My Stickease tags that resembled that of the other kit.  That tiled border at the top was just too cute not to use, so I didn't have anywhere to put the striped border they wanted us to create.   I just couldn't help myself.   

Thanks for stopping by and come back by tomorrow for the last layout.  Happy Scrapping!

Tuesday, June 19, 2012

Studio J Layout #3

This is layout #3 of our Studio J homework for convention.  This one is another one I followed instructions, and then changed the colors.  All my stuff is girlie, well, because I have a daughter.  So I have a lot pink as opposed to the rusty orange color that was found in the embellishments with this kit.  But, because of it's versatility, I was able to make it kind of girlie.  Here it is...


I still used the same layout and paper kit, much like I did with layout #2.  I just changed it up a bit.  Here's how our assignment started out:

Kit:  Lucky
Pattern:  Portrait Collection
Techniques:
  • Adding a photo mat behind your photo using a journaling box
  • Using letter as embellishments
  • Adding "tabs" of cardstock with journaling boxes
  • Creating a title using several journaling boxes
  • Using a My Stickease image to make a border
I didn't use the My Stickease image to make my scalloped border because it was that rusty color.  So what I did use was the My Stickease title alphabet letter "O".  I thought it turned out pretty neat.  The white circles on the tabs are also the letter "O" from the Cobbler font typed in a journaling box and sized to fit.   There are so many little tricks and techniques you can use to make these pages your own there is no way to list them. 

The beauty of Studio J is you can be creative as you want to be or not.  When you pick out your kit and pattern drop your photos in, you can go strictly by the suggested patterns and embellishments and your pages will be just as lovely.  But it does give you some freedom to customize to suit your style.

Thanks for stopping by.  Come check out another layout tomorrow.  Happy Scrapping!

Monday, June 18, 2012

Ribbons and Butterflies

I totally took advantage of the buy 2 get 1 free Stampaganza special we have going on this month with Close to My Heart. That long list of stamps I had on my wish list got a lot shorter after June 1st :)  Some of the cards I had been eyeing were the quick card stamps. I posted the video earlier in the month on the blog, but I hadn't had a chance to use them yet.  This past weekend I had my chance.  It just so happened that this week's challenge over at Heart 2 Heart  was to make something with at least one ribbon on it.   So, I got to play with my new Quick Card Butterfly stamp and use up some of my ribbon stash.  Here's what I came up with.


The little 3x3 card I totally lifted from Lisa Stenz's project this month.    She has some wonderful ideas.    I loved it so much I knew I had to try it.  I used Chocolate and Sunset ink on mine and the little "thank you" is from another A size stamp set, A Garden.  While I was playing around with my butterfly I thought I would try the same idea on a bigger card.   I used my trusty daubers again and carefully daubed on Chocolate, Indian Corn Blue, and Sunset inks, then stamped onto a Colonial White A2 size card from CTMH.  The "Thank You" is from the stamp set 4 My Friend.   I added some brown ribbon from my stash and there you have it, quick and simple. 

I also had fun with the stamp set, New Arrival.  I have a friend expecting and she had a shower last weekend.  I had whipped up a card for the shower and I like how it turned out, so I made a few more.  Hers was brown and pink, but I went ahead and made some blue and brown, too.  Just in case there might be some little boys in the future. 


Again, very simple cards, but I thought they turned out quite cute.  The stamp was done in Cocoa Ink on Colonial White cardstock.  The brown cardstock is Cocoa.  The shades of blue and pink were some I had in my stash and I'm not quite sure what brand.  I've had the ribbon for quite some time and when I found it I knew I wanted to use it, so I kind of designed my card around it.  Very simple design, but it worked!  They, too, fit the Heart 2 Heart challenge this week. 

Remember you have until the end of June to take advantage of the Stampaganza, buy 2 get one free special.  It's a perfect time to start whittling away at your wish list. 

That's it for tonight.   Thanks for stopping by.  Come back by tomorrow and I'll have my #3 Studio J layout posted.

Happy Scrapping!

Studio J Layout #2

Here is the second layout of our 5 layout  Studio J homework assignment.  This one got really creative with the stickease and color changes. 


This kit is actually the Halloween kit offered in last year's fall issue of the idea book.  Who'd a thunk it?  The assignment started out like this:

Kit:  Mischief
Pattern:  Dynamic Duo
Techniques:
  • Altering the look by changing the colors of B&T papers
  • Rotating a page
  • Using a vellum text box to lighten a color
  • Converting a photo well to a text box
  • Creating your own embellishments   
It would never have crossed my mind to use the Halloween kit to make a sweet little page like this.  This is a prime example of the versatility of this program.  Those little cupcakes started out as a candelabra and candy wrappers, cropped, rotated and well placed. lol.  The cherries on top are brads and the stems are staples.  I thought that was the neatest thing.  

You should check out how this paper kit starts out and compare to the end product.   It really blew me away and I was the one making it!

Thanks for stopping by.  Happy Scrapping!     

Sunday, June 17, 2012

Studio J Homework - Finally done!

It just so happens that I am fortunate enough to get to go to convention for Close to My Heart this year.  I am soooo excited.  Everyone who is attending this year had homework to do prior to the convention.  All attendees got the chance to create five 2-page layouts.  The homework part is they assigned certain paper kits and layouts to use for each one.  They have all kinds of techniques they want everyone to be familiar with before convention.   It proved more challenging than I intended, only because my decision making skills are horrible :)

For those of you haven't tried Studio J, you really should give it a shot.  I am a classic scrapper.  I like getting my hands dirty and my desk messy.  But there is a place in my heart for Studio J as well.   I have also done digital scrapbooking with Photoshop and Paint Shop Pro.  It can be quite tedious with those programs.   Close to my Heart has elminated all that tedious work and created a program that allows you use of the digital versions of all the wonderful papers and embellishments they have.  There is no program or supplies to buy, only a membership and then the printed layouts you create.  So you don't have to worry about using space on your computer for the software.  You upload your pictures and use their online program.  As long as you have a computer and an internet connection, you're in business.  So whether you are sitting in the doctors office, in the pickup line at school, a friends house, or at your home, you can scrapbook. 

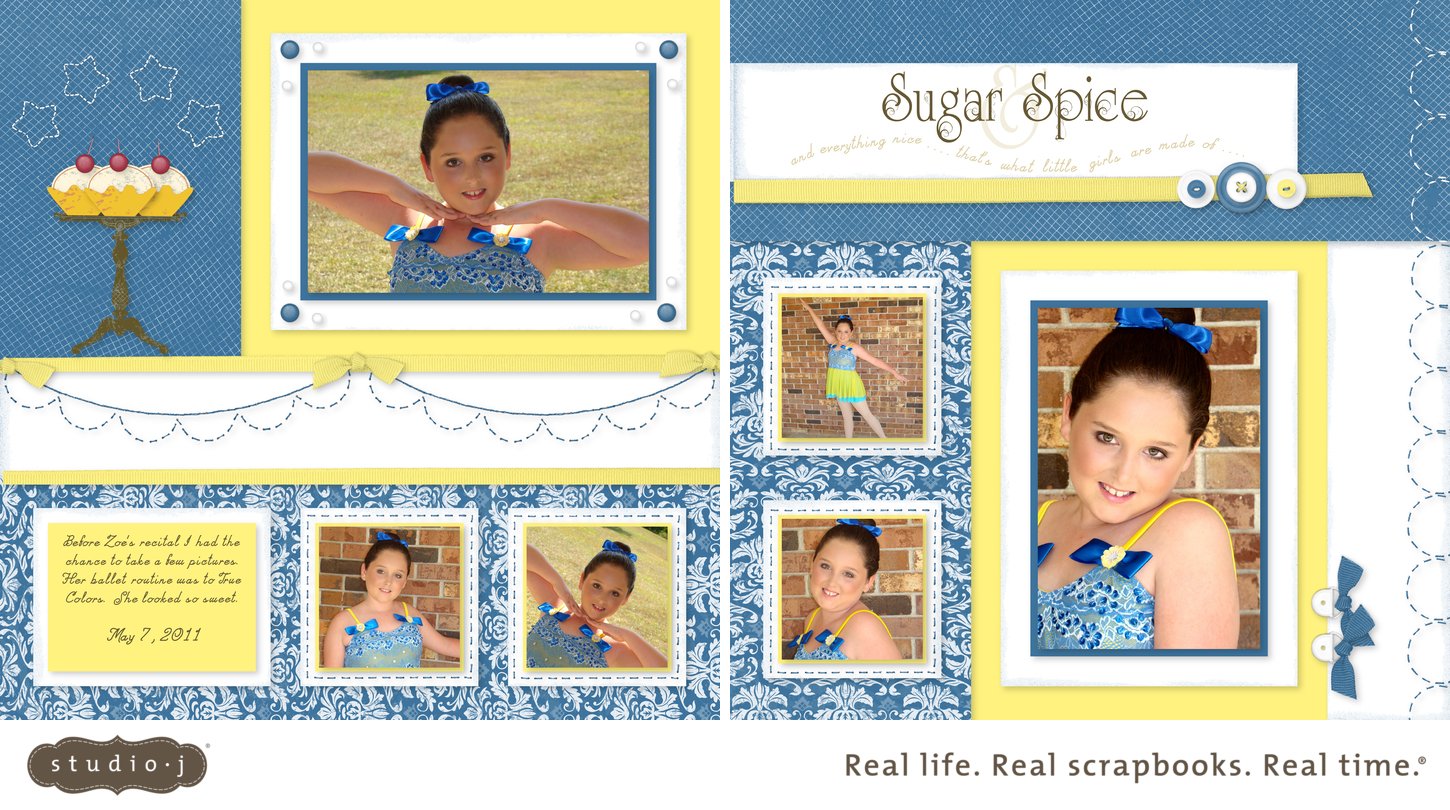
I just finished up my layouts today.  With the purchase of the layouts, as a member, you also get free .jpgs of your creations.    This enables you to post them online, as I am about to do, or put them in your screen saver rotation, which I am also about to do.   Here is layout #1:


The assignment started out like this:

Kit:  Lucy
Pattern:  Stars Above
Techniques: 
  • Deleting unneeded photos wells
  • Using text boxes to cover up portion of the pattern
  • Cropping My Stickease borders to make ribbon streamers
If you log into StudioJ and pick that kit and that pattern, you can see there are some differences.   I did follow the assignment directions exactly but then I added my spin on it. 

To keep this from being an incredibly long post, I'll add the rest of the pages one at a time for the rest of the week, so come back and see my creations.   Check out Studio J if you already haven't.  It's free to browse around. You can even create a layout or two and see how you like it.  

Thanks for stopping by.  Happy Scrapping!


Thursday, June 7, 2012

Heart 2 Heart Weekly Challenge - Black and White and One Color

This week over at  Heart 2 Heart they have a color challenge going on.  Their challenge is to make something with black and white with a splash of color.  I just finished a card that fits that bill.  Black, white and Tulip it is.


This is just a standard card size.   I had all these little scraps of white paper leftover from another project I had done.  I couldn't let it go to waste.  So.....I stamped it :) The stamps used are Hooray Bouquet, You've Got Flair, the Pemberly WOTG stamp set, and You Are.    I cut the flowers and medallion from the AP cricut cartridge.  Stamp, trim, glue and voila, a card. 

Just so happens I was working on a little set of note cards that was black and white and tulip, too.  These are  4x4 cards, and are made just like my little 3x3 set I had on here previously. These are always fun to make.   They are easy and cute, too,  I think.


Again the stamps are Hooray Bouquet and the Pemberly WOTG set.  Super simple cards they are.  Stamp the background on half of the face.  Cut a small strip of black cardstock.  Ink your little precut flower and glue.  The Hooray Bouquet stamp set is definitely one of my most used stamp sets.  It's just so fun :)

That's all for me tonight.  Thanks for stopping by.  


Happy Scrapping!
 

Saturday, June 2, 2012

H2H Weekly Challenge - Add a Photo

This week the challenge over at Heart 2 Heart was to add a photo to your layout.  This layout is the last of my daughter's dance pictures I had for this year.  The other two were her single pictures of tap and clogging and this was of their jazz group.  Although it wasn't our favorite costume, it did make a striking picture against the white backdrop.  Burnin Love was the song they danced to, hence the title.


I wanted to keep it fairly simple by just using the colors in the photo. I definitely didn't want anything to upstage my dancers.  The patterned paper was actually made from a stamp in the Love Life set.   I used black ink on white daisy cardstock and repeated the stamp to make it a background.  The stars are from that set, also.  This set has been around a while, but I love it.  You can't really tell from the picture, but the little stars were embossed with our clear detail embossing powder for a little extra shine on the pattern and the larger stars have sparkles on them.  Love was cut from the red cardstock and then coated with liquid glass (have I mentioned I love that stuff?).  The ribbon on the tag is our color ready seam binding ribbon daubed with ink. 
When I saw this picture, I immediately thought stars.  Just a few stars on the page to compliment the stars in the picture.  Keep shining girls! 

If you haven't checked out all the wonderful layouts and cards over at Heart 2 Heart, you shoud head that way.  They have some crazy talented folks over there. 

Thanks for stopping by and have a great weekend.  Happy Scrapping! 


Friday, June 1, 2012

Stampaganza

This month Close to My Heart is having a Stampaganza.  Now is the time to get those stamp sets that have been on your wish list.   For every two stamp sets you purchase, you get a third of equal or lesser value for FREE!   Whether you want to stock up on the quick card stamps or enlarge your alpha stamp set collection, now is the time to take advantage of this great deal.  

For those not familiar with the quick card stamps, I posted this nifty video to show you a few.  At $6.95 each, these fun A size stamp sets are perfect for whipping up some great cards in just minutes. 


Happy Scrapping!