Thursday, January 30, 2014

OCC Stenciled - Day 3

We had another day off due to weather..yay. Well, not yay, that it was bad weather, but yay I didn't have to go to work :) The day here has been rather nice.  Any day home where I can make cards is a nice day in my opinion.

I'm still working on some cards from the OCC - Stenciled class.  Day 3 was using stencils with embossing pastes and powders.  I have had some embossing paste for a while and never had a chance to try it out.  Today I seized the opportunity.


This card was inspired by a card from Debby Hughs.  Her card had a misted background, which I loved, but didn't have the colors I wanted in re-inkers.  I used my dauber and added Cotton Candy and Honey inks to one side of my card.   The colors are a little off in the picture, but close.  I used my Falling Snow stencil from SSS, but instead of using it top to bottom I turned it on its side so that the largest concentration of dots was on my left instead of top.  My embossing paste was Studio 490.  I had never used it before.  What I did learn is that even though it is white, it picks up the color from ink you put it on.  Maybe not if it was misted, but applied like I have it did.  I wasn't displeased with the outcome, just a little surprised. You can barely see the dots in the background in this picture, but there is much more dimension in person.  The butterfly is a SSS die called Leanna and the flower is from Memory Box, called Fresh Foliage. I used Hero Arts white embossing powder to emboss my sentiment on some vellum.  I also have a new found friend in Kool Tak clear foam adhesive, which I used to attach my vellum.  I added a few pearls and called it done. 


The card above was done just the opposite of the first one.  Using my ink pad and I stamped directly on my craft sheet and then put the embossing paste  into the puddle where I had stamped.  After swirling it around on the sheet it picked up the ink color beautifully.  I used Sorbet and Creme Brulee inks to color the paste.  I used the same stencil as above in the same manner.  Using both colors in the paste gave it a an ombre coloring to the dots.  I really liked it and it's fun.  I used Sorbet and Creme Brulee cardstock for the banners and scalloped circle.  The butterfly is the Leanna die again.  This time I used two layers of cardstock so the die didn't quite cut all the way through.  This allowed me to have the designs without the fallout.  I used my inks and daubers and colored his wings.   I really wasn't sure what kind of card I wanted this to be.  I ended up with a birthday sentiment embossed on vellum.  I didn't have any matching pearls, so I used my Sorbet alcohol marker from CTMH and colored a plain white pearl.  Works wonderfully when you need one to match. 

That's it for now.  I have a couple of more things I want to try out before the day is up.  Thanks for stopping by !

Wednesday, January 29, 2014

OCC Stenciled Day 2

I hope everyone out there in blogland is weathering this winter storm.  We got lucky here in Florida and only got a little ice and snow in some places, nothing like our northern neighbors.  To those who did get the brunt of it, stay warm and safe.   It's a good thing scrapbooking and cardmaking are an indoor sport because that's what I plan on doing today!

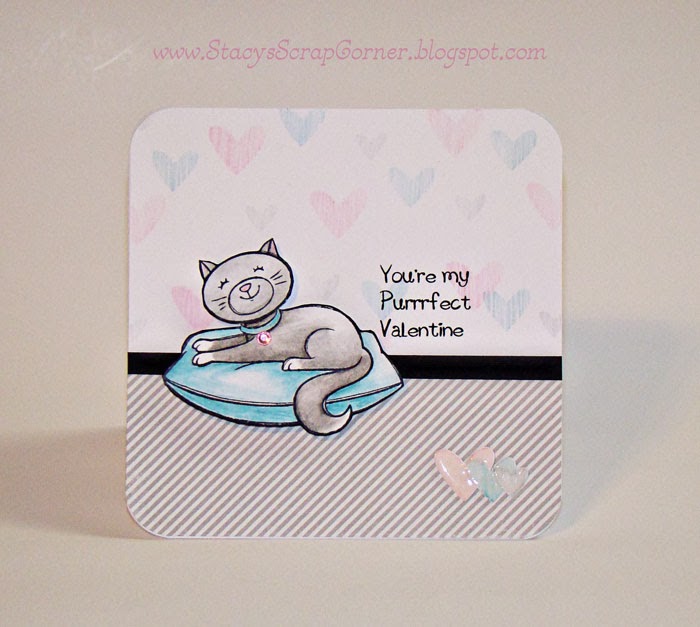
First I wanted to quickly share with you another card I made for homework in the Online Card Class, Stenciled.  Kristina Werner used her stencils and pencils to make some really nice and simple cards.  I loved the technique.  That's one thing I do have plenty of is pencils. I dug out my prismacolors and made a card with the same design as hers.


I used the sentiment from the January SSS card kit and added some cardstock from my stash.   Making the background like this is fun.  I had cut several little hearts from a piece of cardstock for another project I was doing so I used the negative space left as a stencil for my hearts.  This is simple and quick.  

I had previously stamped and colored a little cat from the CTMH stamp set Cozy Cat.  I wasn't sure what I was going to do with him.  I decided to try this technique and incorporate him for a Valentine's card. 


I didn't have a sentiment that just struck me as going with this card so I typed this one on the computer and printed it on my cardstock.  I then used my same heart stencil with the CTMH watercolor pencils I had painted the cat in and created the subtle background.   I found some of the little hearts I had die cut and, using the same pencils, colored them in.  I glued them together and used liquid glass to add a little shine.  In hindsight, I should have colored my hearts a little darker on the die cut pieces.  Sometimes when using liquid glass it tends to lighten or slightly change the color on the paper.  Just a little tidbit to keep in mind when making matching embellishments. I carried the same hearts over to the inside of the card as well. 


That's it for now.  I'm going to try to get some more cards done today.  I'll be sure to post as soon as they are done.   Thanks for stopping by!  


Monday, January 27, 2014

Online Card Classes - Stenciled - Day 1

Just a quick post tonight.  Per usual, I'm behind.  Online Card Classes had another class, Stenciled, which started Friday.  The class actually ended today.  It was yet another great class filled with gorgeous cards from talented instructors.  I am just now getting around to creating my first card from class.

The first day used stencils with inks.  I loved the card that Debby Hughes created and I used that for my inspiration.


The card base and front panel were cut from White Daisy cardstock.  I used the Diagonal Stripe stencil from SSS along with Cotton Candy, Honey, and Sunset inks to create the background.  I die cut some hearts using heart dies from Lawn Fawn from the white cardstock and used daubers with the same inks to color my hearts.  The sentiment is cut from a SSS die.  

It was a very quick, easy, and fun card.  I liked the end result with the partial background using the stencil.  The class has been very informative as well as inspirational.  I foresee more stencils in my future. 

That's it for me tonight.  Hopefully, I can get a few more class cards done.  Thanks for stopping by. 

Sunday, January 26, 2014

Love You Sew Much - SSS January Card Kit

I'm finally getting around to posting this card.  Last week was a terribly busy week.  We got new product in from Close to My Heart for the upcoming Spring/Summer Idea book, which goes live on February 1.  We had an open house last Friday, so  I'll be posting some of the stuff I created from the new paper packs in the near future.  Be sure to check back soon. But for now, I have another card from the Simon Says Stamp January card kit.

This stamp set in the kit, not only has my cute little alien friend, but this neat stitched sentiment and the stitched line border.  The stamp set is called Loved and I just love it :)


This is a standard sized top fold card cut from Bazzil Marshmallow cardstock.   The patterned paper is from the kit.   I stamped the sentiment and the stitching around the outside of the card in Whisper ink.  The little heart is stamped in Hollyhock.  

The card turned out very soft, sweet, and simple.  I was pleased with it. With Valentine's day coming up, I hope to get a few more cards done this upcoming week.  Along with the gazillion other things I want to do..lol.  

I almost forgot this little scalloped card.  It came in the kit as well. It is 3"x4".  I used the same sentiment and border as above, but stamped it in black. The little heart is stamped in Hollyhock.  A little bit of black and white baker's twine finished it off.  This little card would be great used accompanying a gift. 


That's it for me tonight.   Thanks for stopping by!    

Wednesday, January 15, 2014

My Alien Valentine

I'm still playing in my January card kit from Simon Says Stamp.  I've become quite fond of the little alien.  The papers in the kit have some really neat designs and lovely colors.  I followed Freshly Made Sketches #118.  I missed the cut off to enter the challenge, but I still wanted to share it with you.


All the patterned papers are from the kit. I threw a strip of Whisper cardstock in the band.  I stamped the sentiment in Whisper ink.  The little alien was stamped onto Bazzil Marshmallow in Stazon ink and I used my distress markers in a watercolor style to color him.  The little sparkles are actually tiny sequins from last month's card kit.  They are a little tough to handle because they are so small, but they are cute. 

In an earlier post I mentioned I had purchased some distress markers, but wasn't sure if I liked them or not.  I had thought maybe it was the paper, but I think it was the markers themselves.  I had purchased them at a big chain craft store and I'm thinking maybe they had hung there (vertical) a little too long, or something. They just didn't act like I had seen on all the videos.  I really couldn't figure out what all the fuss was about.  I decided to give them another shot and ordered a set from Simon Says Stamp. Wow, what a difference.  I must say, I do love them. This color was Evergreen Bough.   I couldn't have asked for a better match.  I experimented with different papers and inks and my preference for what I was doing was the Stazon ink and the Bazzill paper. I tried it on watercolor paper, but it actually pilled a little more than this one did.  The ink seemed to stay on top more with this paper and I was able to move it around more before my paper got saturated.  I'm going to continue to experiment, but I think I can add them to my "love" list.  I'm not sure if I'm doing it right or not, or if I'm even using the 'right' ink or not, but it worked for me. 

That's it for me today.  I have a couple of more cards from the kit I'll be posting as soon as I get them uploaded.  Thanks for stopping by!

Monday, January 13, 2014

SSS January Card Kit

Finally, I get to play in my card kit before the last week of the month!  I stole a few minutes yesterday to create a card from the new card kit.  The stamp set in the kit is called Only Have Eyes for You and has this cute little three-eyed alien.  It is a fun little Valentine's stamp set.


That patterned heart paper is from the kit.  I used Cotton Candy and Whisper cardstock from CTMH.  My card base is Bazzill Marshmallow.  It, too, comes with the kit.   The sentiment, alien, heart balloons and string are all a part of the stamp set.  How cute is that?  I stamped my hearts in Cotton Candy and Blush ink from CTMH.  I used my CTMH watercolor pencil in Grey Wool to color in my little alien.   I also used my Wink of Stella clear glitter brush and went over my alien when I was done.  Of course, you can't see in this picture.  I'll try to get one up close.  The glitter brush is just enough to give a glimmer.  I love the subtle sparkle you get. 


I decorated the inside of the card with the same colors and the Valentine sentiment from the stamp set. 


I may have gone a little overboard on the hearts, but they were cute and fun.  Who can resist cute and fun? Lol. 

That's it for me today.  Hopefully, I can get back to my craft table at some point.  I'll be sure to share when I do.  Thanks for stopping by! 


Saturday, January 11, 2014

Anniversary Keepsake Box

Today is one of those days when you really don't want to get out of your pj's.  It's rainy and overcast outside and just generally, blah.   Thank goodness it's always sunny in blogland, so here I am :)

I just had a quick post to share my latest creation.  Yesterday, was a special day. For starters, it was the anniversary of my 29th birthday.  Yes, I'm still holding on to that :) But even warranting more celebration, it was my downline's 50th wedding anniversary.  How amazing is that?  Birthdays come every year, but a 50th wedding anniversary, that's a once in a lifetime thing.  I wanted to do something special, and a little different than just a card.  A fellow CTMH consultant, Kathy Skipper, had shared some of her altered boxes on her youtube channel.  I thought they were just the neatest things, so I gave it a go.


I found the box at Michael's.  Originally, I was going to cover the whole box with our paper, but I really did like the look of the box, so I just added to it.  I used all kinds of things to make this box.  I'll try to list them all at the end.   


This is the side view.  The lighter paper is White Daisy cardstock and I used Champagne ink to give the edges an aged appearance.   The little purple flower is a retired charm from CTMH. 

I wanted some way to really personalize the box, so I put a little place on the inside to add a picture.  


The idea was to have something they could put bits and pieces of how they celebrated their 50th anniversary into.  I thought it was a neat way to collect ephemera from a special occasion.   

Here's a look from another angle that shows all the sides. 


I have a feeling I will be doing more of these.  It was certainly fun and a pleasant change of pace.  Making all the little flowers could be quite therapeutic in the right environment. 

That's it for today.  I hope everyone's day is less soggy than ours here in the panhandle.  Thanks for stopping by. 

Happy Anniversary Ms. Barbara!

Papers:  White Daisy, Gold Glitter Paper-CTMH;  for the flowers - Coredinations by Darice
Inks:  Black, Champagne - CTMH
Die cuts:  Artiste, Artbooking - CTMH; banners - SSS; Iron Work Accents, Labels 22, Marvelous Squares -SB
Other stuff:  liquid glass, glue dots, black sparkly 


Wednesday, January 1, 2014

Happy New Year! Are you on Cloud 9?

Happy New Year everyone!  I hope everyone has had a safe and enjoyable one. I can't believe it's January already.  Not only is it the first month of the year, but it's National Papercrafting Month.  To celebrate, Close to My Heart is offering a Cloud 9 card kit for only $15 with a qualifying purchase of only $35.  Consultants got to get theirs early of course, so I got to make mine today.  They say what you do on New Year's day is what you do all year long.  I hope that's right. I made a point not to do laundry or clean too much, but I did make a point to make cards! Lol.

The kit comes with enough supplies to make ten cards, two each of five designs.  Per usual, I didn't follow instructions on most of the cards, so mine are a little different. The one I did make per instruction was the one below.


The gold polka dotted washi tape and the teal shimmer trim are new products that will be in the Spring/Summer Idea Book that goes live on Feburary 1.  Both of these are really neat.  Also included in the kit are cutouts for the stamps.  This moustache was stamped with Lagoon pigment ink.  I couldn't seem to get the opaque coverage I wanted with the dye ink, but when I switched to the pigment ink it was perfect.

I pretty much followed the instructions on the card below.  It does look how it was intended, but I switched out the Honey cardstock for the piece of Sunset behind the clouds.  I also inked all my edges including the clouds.  I thought it added a little more of a finished edge.  I used 3d foam tape to give it all a little more depth.


The cards below were close to the instructions, well, one was. The one on the right was made with the stamp from the set.  The sentiment on the left is from the Joyful Birthday stamp set.  


I inked all my edges in both cards.  I also inked my stars in the card on the right in Lagoon.  I didn't use the teal shimmer trim in there either, but I made up for it with the one on the left :) 

The cards below also kept the same design and are done mostly by the instructions.  I just changed the color around a little bit. 


Instead of using the polka washi tape I used the reverse side of the paper.  I reversed the inks between the two cards as well.  The hearts on the left are the cutouts that came with the kit.  I simply covered them with the teal shimmer trim and then trimmed around them. 

The last card I did was actually the second card listed on the instruction sheet.  I really love the colors of the paper in this kit.   The stamps are different from what I usually prefer, but still very interesting.  The "Thanks" stamp in the set just did not strike me as going with this paper.  I really don't know why, but sometimes things just have a certain feel.  I decided to switch it up for what I thought it 'felt' like. 


This suits me a little better.  The arrow design is from our stamp set One Way Borders.  I stamped the Thanks stamp from the Cloud 9 set in Versafine ink. I used our alcohol markers in Lagoon to get the faded coloring on the letters. I trimmed all the excess around the stamp and used my black Copic to give it a finished edge.  I added a strip of our black shimmer trim and a strip of Lagoon cardstock.  I popped the 'Thanks' up on some 3d foam tape and added the silver triangle studs from the kit.  Those really are silver, they just happen to be reflecting the lighting in the room making them look gold.  I think this one turned out to be my favorite. 


If you would like to have a Cloud 9 kit of your own, be sure to make an order this month of $35 or more and it can be yours for only $15.  You can visit me, here, for more details, or drop me a line if you have any questions.  

That's it for me tonight.  Thanks for stopping by!  Happy New Year!